

Showing posts with label DIY home. Show all posts
Showing posts with label DIY home. Show all posts
Sunday, October 21, 2018
Color Coordinated Bookshelves
I've always dreamed of having bookshelves in my living room to display all my stuff. And now finally, it's here!

Thursday, October 4, 2018
Decluttering and Organizing our home (part 1)
I'm sure I'm not the only one with dreams of having a perfectly clutter-free home. Especially for those with kids, it's such a struggle to keep everything neat and orderly with their endless toys, books, clothes, and shoes everywhere! I mean you've just put back all their toys in the bin and arranged their books on the shelf, and barely 10 minutes have passed and they dump everything on the floor again! Honestly, why do we even bother?!
Anyway, I've been seeing a lot of those professional organizers online these days, hired by celebrities to tidy up their closets. I wish I had the budget for one, but I know I can do it as long as I put my mind to it! Challenge accepted! ;p

Anyway, I've been seeing a lot of those professional organizers online these days, hired by celebrities to tidy up their closets. I wish I had the budget for one, but I know I can do it as long as I put my mind to it! Challenge accepted! ;p

Monday, September 24, 2018
DIY Lampshade Makeover
Lamps are a great way to accessorize any room. And customizing the shade with fabric is a great way to add color or pattern to the space.


Thursday, August 30, 2018
DIY: Painting our front door RED
I've been wanting to give our front door a fresh coat of paint for the longest time, and it's finally done!


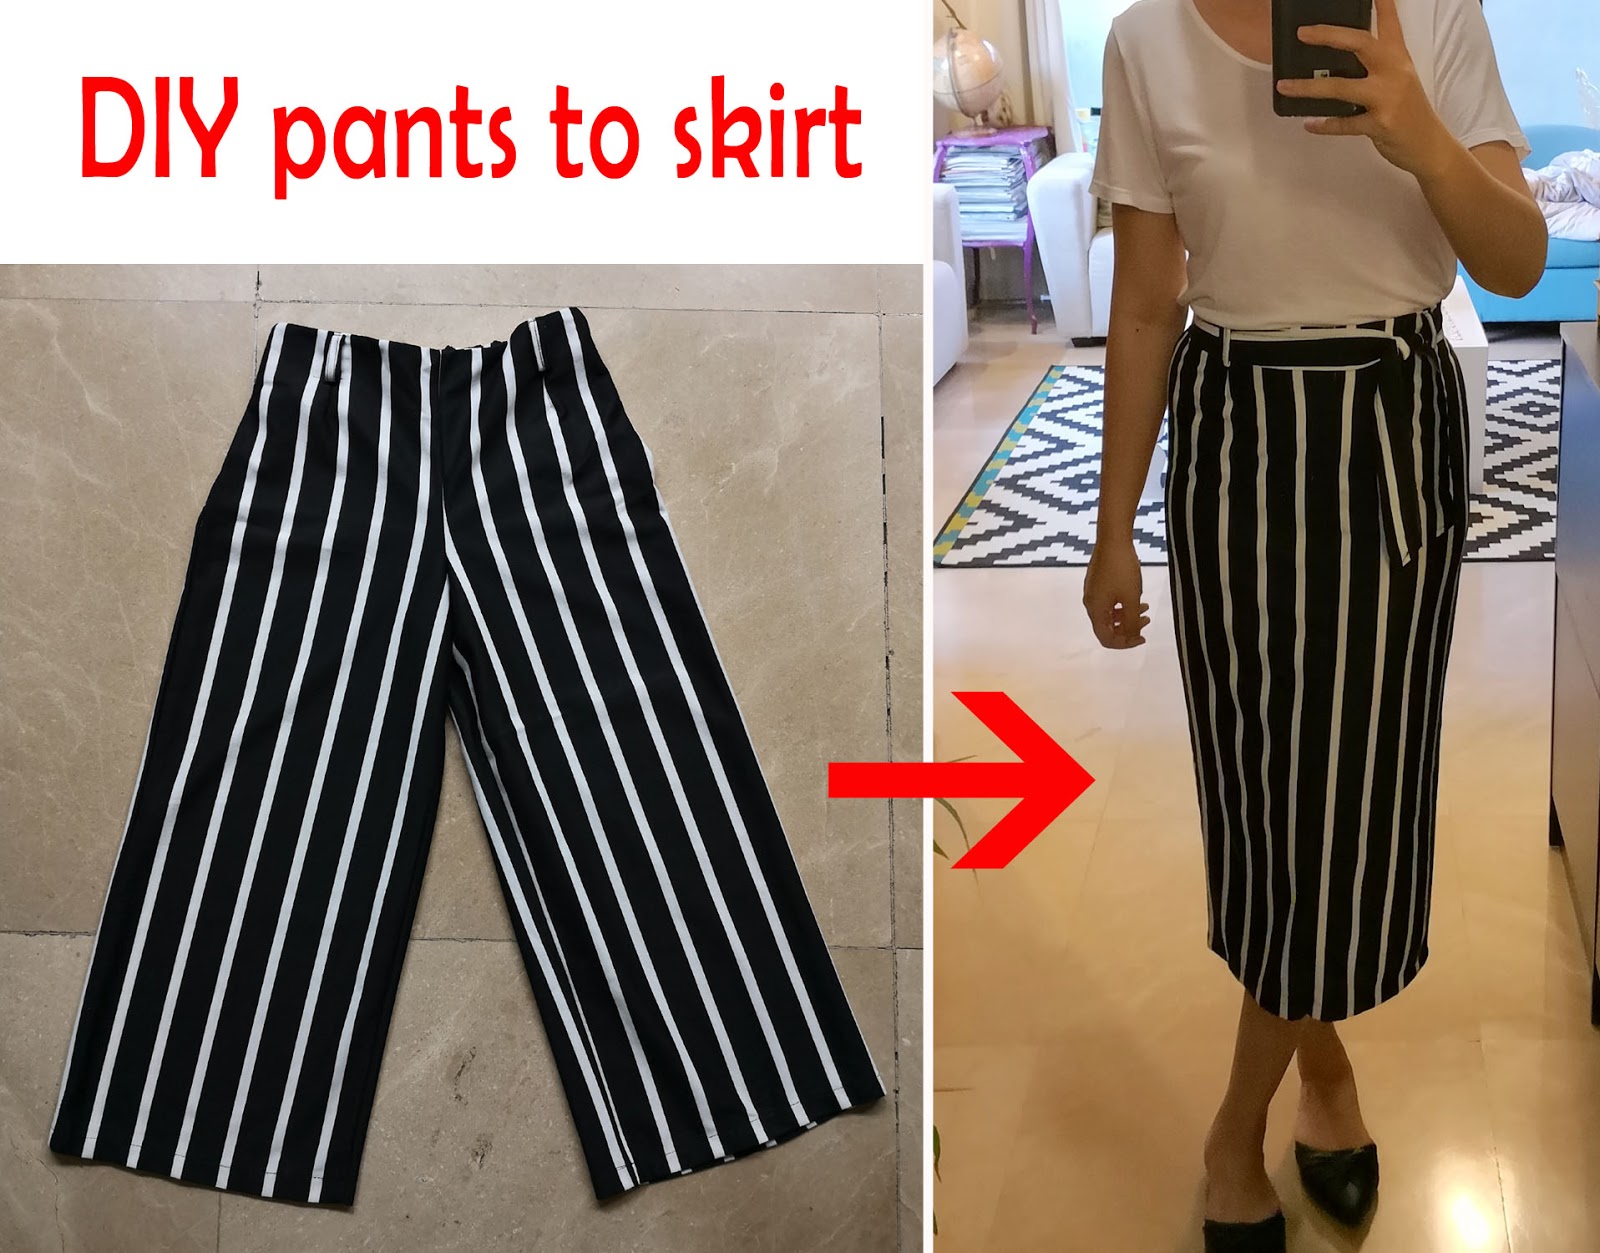
Thursday, July 19, 2018
DIY: Turning culotte pants into a skirt
I have this cute pair of culottes, but I never really liked the way it fit especially in the crotch and butt area (way too tight). But I really liked the striped material, so I decided to just turn it into a skirt!

Saturday, June 30, 2018
Giving our gate a fresh coat of paint
I've hardly done any DIY projects inside the house lately since I guess I've been pretty happy with how everything is so far. However, one thing I neglected was the outside. And that something was our GATE.

Saturday, June 3, 2017
Our updated picture frame wall gallery
I first put up these photo frames back in 2012 when we only had two kids. I've been meaning to change and add photos ever since we had Skyler and finally I've gotten around to doing it.
Here was one side of the wall before:

Here was one side of the wall before:

Wednesday, April 5, 2017

Sunday, April 2, 2017
Room renovation part 2
Here's an update on what my daughter's new bedroom looks like. If you haven't read my past posts, all she wanted for her 7th birthday was her own room (plus loft bed). So we granted her wish and renovated one of the rooms in our house. You can read all about part 1 HERE.


Wednesday, March 1, 2017
Room renovation part 1
All my daughter wanted for her 7th birthday was a loft bed and her own room. She fell in love with the Svarta loft bed from Ikea, so we ended up ordering this from Mobler last November. It's still not here yet, so I'm getting a bit impatient na haha! But for the room, she currently shares one with her brother (see their room HERE and HERE). But of course we knew they would need their own space when they got older.
One of the rooms we have is currently a guest room/storage room. But the layout just isn't right for the loft bed. What I wanted to do was remove the existing closet since I think the loft bed would fit better on that side of the room.


One of the rooms we have is currently a guest room/storage room. But the layout just isn't right for the loft bed. What I wanted to do was remove the existing closet since I think the loft bed would fit better on that side of the room.


Sunday, November 22, 2015
Real Living online features
Our home was featured a few months ago in the August 2015 issue of Real Living. This time, they also published two articles about it on their website!
The first one is basically a photo gallery of the different areas of the house. Read the entire article HERE.

The second one has some DIY decorating tips including some of my own personal projects like making your own wall stickers and creating silhouette portraits. Read the entire article HERE.

So again, thank you to Real Living for all these features. Really makes all the efforts in making my DIY projects and decorating on a budget worth it! :)
Tuesday, August 4, 2015
DIY Triangle Accent Wall
After I painted my kids' room blue, I knew I wanted to do something with the main wall behind their bed. It previously had an owl mural so the plain blue was just looking well a little... plain. ;p


Saturday, June 6, 2015
DIY: Repainting my kids' room
I'm probably the most adventurous when it comes to doing painting projects in my kids' room since it's not that big. I know I can pretty much do it myself without spending a whole lot for materials. One of my very first DIY projects was doing this owl tree mural, which is probably one of my all-time favorites.

After, I decided to paint half the wall purple, just to give it an accent color.

Then, I went all out and painted stripes on the ceiling since I figured, why not? ;p

I guess I'd forgotten how much work it actually took to do these projects since after a while, I was itching to make some changes again. Plus the kids were getting older, which meant they could already give me input on what they wanted. Both my son and daughter stay in this room so I couldn't really choose between a "Princess Underwater" or "Power Rangers" theme. ;p
Basically, I knew I just wanted to change the color of the walls first. Of course, it had to be gender neutral and something that would match the striped grey and white ceiling (no way was I repainting that anytime soon since it took me forever to do that!). Honestly, it was so hard to choose especially when I was looking at paint swatches since there were so many nice colors!

In the end, I decided to go with an light blue color called PEACE RIVER in a satin finish. I got a gallon of paint which cost about P1k. This was honestly more than I was expecting to pay for the paint, but it was good quality which meant good coverage. So I figured it was fine since I was going to be looking at those walls for quite some time right? :)

Before I got started though, I first wiped the walls using a damp cloth. This is important since a lot of dirt and residue can accumulate on your walls over the years. Mine was super dusty, I didn't even realize it! I also sanded over any uneven parts from my previous paint job. You definitely want a smooth and clean surface when you start.
Since I was repainting over the owl mural and also the purple half of the wall with a lighter color, I had to get a primer so I could even out the color first. Others might just go ahead and paint over everything at once, but you might need more coats to make sure the old paint color won't show through. Personally, I think a primer saves you time and energy and just ensures a nicer end result.

I loved putting on the primer since I didn't need to be neat about it. It doesn't have to be applied perfectly since you'll be covering it up with your new paint color anyway.


After everything was covered, it was finally time to really paint. I also love how my little assistant was back! She also helped me paint the purple half of the wall before. I had to kick her out after a while though, since honestly, we would never finish with her around! lol ;p

Anyway, if you think it was easy, it was NOT. I definitely need blog posts like these to remind me of the blood, sweat, and tears it took to finish painting the damn room! I blame HGTV for making it look like a breeze haha! And honestly, who here hasn't looked around a small space and confidently thought, "I could paint this in a few hours max!"
Well, it took me 3 days and I almost gave up and hired someone to finish it for me. I think maybe it was because of the cheap paint rollers I used, or maybe I just bit off more that I could chew. But I got the job done in the end and it's beautiful if I do say so myself!

I love how the color turned out! Even though it's blue, the light shade is still feminine enough for a girl. The primer definitely worked since it covered all the old paint perfectly. And the color made the room brighter and fresher, don't you think? My kids are happy and so am I!

My whole body was aching for days after I did this - from all the bending over, reaching up, and going up and down the ladder. I now have a newfound respect for house painters! I told hubby I won't bargain anymore when a painter charges for labor since I now know how hard it is to do their job haha! ;p
I honestly want to paint over a lot more walls in our house (like the accent wall in our living room and also our master bedroom). But with this weather, it will definitely take a while before I do manual labor again hehe! But stay tuned since I have a lot more home improvements coming up soon. :)

After, I decided to paint half the wall purple, just to give it an accent color.

Then, I went all out and painted stripes on the ceiling since I figured, why not? ;p

I guess I'd forgotten how much work it actually took to do these projects since after a while, I was itching to make some changes again. Plus the kids were getting older, which meant they could already give me input on what they wanted. Both my son and daughter stay in this room so I couldn't really choose between a "Princess Underwater" or "Power Rangers" theme. ;p
Basically, I knew I just wanted to change the color of the walls first. Of course, it had to be gender neutral and something that would match the striped grey and white ceiling (no way was I repainting that anytime soon since it took me forever to do that!). Honestly, it was so hard to choose especially when I was looking at paint swatches since there were so many nice colors!

In the end, I decided to go with an light blue color called PEACE RIVER in a satin finish. I got a gallon of paint which cost about P1k. This was honestly more than I was expecting to pay for the paint, but it was good quality which meant good coverage. So I figured it was fine since I was going to be looking at those walls for quite some time right? :)

Before I got started though, I first wiped the walls using a damp cloth. This is important since a lot of dirt and residue can accumulate on your walls over the years. Mine was super dusty, I didn't even realize it! I also sanded over any uneven parts from my previous paint job. You definitely want a smooth and clean surface when you start.
 |
| it was definitely hard to take the owl mural down, but it's time for a change ;) |
Since I was repainting over the owl mural and also the purple half of the wall with a lighter color, I had to get a primer so I could even out the color first. Others might just go ahead and paint over everything at once, but you might need more coats to make sure the old paint color won't show through. Personally, I think a primer saves you time and energy and just ensures a nicer end result.

I loved putting on the primer since I didn't need to be neat about it. It doesn't have to be applied perfectly since you'll be covering it up with your new paint color anyway.


After everything was covered, it was finally time to really paint. I also love how my little assistant was back! She also helped me paint the purple half of the wall before. I had to kick her out after a while though, since honestly, we would never finish with her around! lol ;p

Well, it took me 3 days and I almost gave up and hired someone to finish it for me. I think maybe it was because of the cheap paint rollers I used, or maybe I just bit off more that I could chew. But I got the job done in the end and it's beautiful if I do say so myself!

I love how the color turned out! Even though it's blue, the light shade is still feminine enough for a girl. The primer definitely worked since it covered all the old paint perfectly. And the color made the room brighter and fresher, don't you think? My kids are happy and so am I!

My whole body was aching for days after I did this - from all the bending over, reaching up, and going up and down the ladder. I now have a newfound respect for house painters! I told hubby I won't bargain anymore when a painter charges for labor since I now know how hard it is to do their job haha! ;p
I honestly want to paint over a lot more walls in our house (like the accent wall in our living room and also our master bedroom). But with this weather, it will definitely take a while before I do manual labor again hehe! But stay tuned since I have a lot more home improvements coming up soon. :)
Saturday, March 14, 2015
Removing mounting tape from your walls
Most of the frames in our house are hung on the walls using double-sided mounting tape.
 |
| bought this in National Bookstore for P30 |
This is mainly because of these reasons:
1. I'm scared and don't know how to use the electric drill
2. Hubby hates drilling
holes in our walls so useless to ask him for help (well, he did drill some bathroom stuff for me once after I begged him to!)
3. I have a lot of frames and wanted the option of removing or rearranging them later on without having to deal with holes in the wall
Well, all those frames I've put up the past couple of years have remained untouched, until recently when I updated our family silhouette art. I was nervous since I didn't have a good experience in taking off those adhesive hooks before, which also used the same type of tape. The tape in one hook ripped the paint off my wall when I removed it. :(
Anyway, after all this, I now know that mounting tape
is super strong stuff! When they say heavy duty, they mean it! And the thing is, I used quite a lot
because I was afraid of the frames falling and breaking later on (none ever did). Now I'm
learning the hard way. It was a pain to remove! The frames really wouldn't
budge no matter how hard I tugged on them.
What I finally did was to get a
knife and tried to slice carefully through the tape. It was challenging since I didn't want to destroy the walls by peeling off whole chunks of paint which would have been much worse than drilling a hole in the first place. Plus I really needed to put some force for the knife to cut through the adhesive. It did work but there was a lot of stuff left on the walls.


I asked hubby for help and what he did was put baby oil on the remaining adhesive to soften it up. Then he used an old toothbrush to scrape off what was left and finally a washcloth to scrub and clean everything up. And it worked! It took a bit of effort but the walls were damage free, aside from a bit of discoloration from where the frames used to be.
 |
| yey good as new! :) |
So the question is, did I use mounting tape again considering how hard it was to remove?
YES, I DID. ;p
But this time, I used less and only on the sides, not anymore in the middle (since that was the hardest part to remove with the knife). The main thing for me was that mounting tape does its job of hanging the frames and even though can be a pain to remove, at least no holes in my walls!

Thursday, March 12, 2015
Updated Family Silhouette Art
I made a DIY silhouette art of our family back in 2012 when it was just me, hubby, Miley and Sabe.
I've been meaning to update it last year ever since Skyler was born, but never got around to doing it until a few days ago. I was thinking whether to just keep our old silhouettes and just add another one for Sky, but decided to just redo everyone's artwork. And it was nice to see the difference after a couple of years. :)
I bought my frames in SM also a few years ago and if I remember correctly, they only had those 4 colorful ones (aside from white and black). Good thing I had the white one and also some yellow spray paint lying around. In just a few minutes, I had my new frame ready! :)


Now here's our updated silhouette art on the wall (and the new arrangement of the frames). So happy Skyler's now part of it! :)

 |
| read more about this DIY project HERE |
I've been meaning to update it last year ever since Skyler was born, but never got around to doing it until a few days ago. I was thinking whether to just keep our old silhouettes and just add another one for Sky, but decided to just redo everyone's artwork. And it was nice to see the difference after a couple of years. :)
 |
| LEFT: Miley in 2012, RIGHT: Miley in 2015 |
 |
| LEFT: Sabre in 2012, RIGHT: Sabre in 2015 |
 |
| Skyler's silhouette at 1 year old |
I bought my frames in SM also a few years ago and if I remember correctly, they only had those 4 colorful ones (aside from white and black). Good thing I had the white one and also some yellow spray paint lying around. In just a few minutes, I had my new frame ready! :)
Now here's our updated silhouette art on the wall (and the new arrangement of the frames). So happy Skyler's now part of it! :)
Monday, August 4, 2014
DIY: Sunburst Mirror Makeover
Remember this sunburst mirror I made out of wood shims? Well, I decided to give it to my sister who redecorated her room (actually, it was my old room when hubby and I still lived at my mom's house). She didn't like the natural wood finish since it didn't go with the new paint colors and furniture, so we decided to make it silver. :)
We just used a couple of coats of spray paint and the whole thing was done in about 15 minutes.


Here's the BEFORE and AFTER look. From my living room to it's new home in the bedroom.

If you noticed the reflection in the mirror, the opposite wall is painted with gray and white stripes which we also DIY'd. :p

Doesn't the silver look so much better with the purple background and black furniture? I think it's the perfect accent piece for the room. :)

 |
| time for a makeover! |
We just used a couple of coats of spray paint and the whole thing was done in about 15 minutes.
 |
| used masking tape to cover the mirror while painting |
Here's the BEFORE and AFTER look. From my living room to it's new home in the bedroom.
If you noticed the reflection in the mirror, the opposite wall is painted with gray and white stripes which we also DIY'd. :p
Doesn't the silver look so much better with the purple background and black furniture? I think it's the perfect accent piece for the room. :)
Tuesday, July 22, 2014
DIY Dress Repair
I saw this dress from Zalora a few weeks ago and fell in love with it immediately. First of all, I'm loving wrap dresses right now (especially for breastfeeding) and this print was also the same one as a Seek The Uniq tunic I missed out on before.

So I had it washed and was all set to wear it out for an event...

But then, my heart skipped a beat when I noticed something...

Oh. Em. Gee. Ang laki ng butas sa collar! Obviously nasunog siya when it was ironed. The dress is made of jersey but it has this tissue-like thing inside the collar (probably to give it shape) so I guess it wasn't able to handle the heat. Pero kainis lang kasi wala naman care instruction label un dress so malay ba namin right?

You know what, the younger me would have thrown a fit and started screaming like crazy after seeing this. Imagine, hindi pa nasusuot nasira na. And super noticeable pa kasi it was on the collar. But I calmly put the dress back on the hanger, picked another outfit and just decided to do something about it when I got back. I guess having kids also made me more understanding that yes, accidents do happen. And instead of getting mad (which only gives you wrinkles), we should just move on and try to fix the situation.
So after studying the damage later on, I realized that the collar was actually the best place for it to happen. Hindi tumagos un butas sa other side, so I figured I'll just FLIP the collar!

Hubby was reluctant when I showed him and said baka masira pa lalo. But I was confident in my sewing skills. Kaya yan! I removed the tag first (pwede pa actually ibalik ulit later on)...

Then I started making tastas the thread which connected the collar to the dress. Hindi siya madali ha! I had to be very careful not to ruin the dress further so I just did this slowly but surely...

Finally natapos din! I then removed all the stray thread, flipped the collar over and got ready to sew...


I just did basic running stitch since it won't be seen naman when worn...

Tadaaaa! Collar connected and looks good as new! :)

I also stitched up the hole pala just so it wouldn't get any bigger...

Yey, the dress is saved haha! I was literally doing a happy dance after!

Now you can't even tell there was a hole to begin with right? It'll be our little secret ha. :)
So I had it washed and was all set to wear it out for an event...
But then, my heart skipped a beat when I noticed something...
Oh. Em. Gee. Ang laki ng butas sa collar! Obviously nasunog siya when it was ironed. The dress is made of jersey but it has this tissue-like thing inside the collar (probably to give it shape) so I guess it wasn't able to handle the heat. Pero kainis lang kasi wala naman care instruction label un dress so malay ba namin right?
You know what, the younger me would have thrown a fit and started screaming like crazy after seeing this. Imagine, hindi pa nasusuot nasira na. And super noticeable pa kasi it was on the collar. But I calmly put the dress back on the hanger, picked another outfit and just decided to do something about it when I got back. I guess having kids also made me more understanding that yes, accidents do happen. And instead of getting mad (which only gives you wrinkles), we should just move on and try to fix the situation.
So after studying the damage later on, I realized that the collar was actually the best place for it to happen. Hindi tumagos un butas sa other side, so I figured I'll just FLIP the collar!
Hubby was reluctant when I showed him and said baka masira pa lalo. But I was confident in my sewing skills. Kaya yan! I removed the tag first (pwede pa actually ibalik ulit later on)...
Then I started making tastas the thread which connected the collar to the dress. Hindi siya madali ha! I had to be very careful not to ruin the dress further so I just did this slowly but surely...
Finally natapos din! I then removed all the stray thread, flipped the collar over and got ready to sew...
I just did basic running stitch since it won't be seen naman when worn...
Tadaaaa! Collar connected and looks good as new! :)
I also stitched up the hole pala just so it wouldn't get any bigger...
Yey, the dress is saved haha! I was literally doing a happy dance after!
Now you can't even tell there was a hole to begin with right? It'll be our little secret ha. :)
Subscribe to:
Posts (Atom)
LinkWithin
