
Note: I did research and you can paint over marble, it just requires a whole lot of prep work which I don't think I'd be willing to do. ;p

Anyway, I was all set to live with this sorry looking table until I saw some grayish silver tape while I was browsing at Daiso Japan store (that was the day I bought my new plates and mugs hehe!). It wasn't until I got home that I got the idea to use that tape to make a chevron pattern on the tabletop! I went to True Value the next day where I was able to buy some duct tape. Actually, I didn't know they came in different colors (there was purple, green, red, blue, etc). The Scotch brand is quite expensive too at P500 a roll! Good thing I was able to find a cheaper brand. I was torn between buying a yellow one but decided to stick with gray (so it wouldn't compete so much with the already colorful chairs).
Hubby was very doubtful with my plan (in fact, he though I was nuts). But once I get an idea, I can already see the end result in my head and I was sure it was going to look great!

Anyway, the table was 32" x 32" and after deciding on the size of the chevron, I marked the table with a sort of grid (every 4" across and every 6.4" for the height) to guide me when I place the tape. The pencil marks are easily erased after btw.

Look at my cutie patootie assistant helping me measure. I think she's more interested in what's on the iPad though. ;p

Now, here's the thing. If this is your first time to work with duct tape (like me) then you have to know that it is the STICKIEST tape ever! You can't use scissors if you want a good, clean cut because the adhesive sticks to the blade and you end up with a crooked mess (trust me). And this would NOT work with the chevron pattern I was going to do which needed sharp pointed edges. I was all set to call off the whole project (and admit defeat to hubby) but then I read a tutorial that you need to use a craft knife and a self-healing cutting mat (which of course I don't have). I couldn't find a cutter around the house for the life of me during that time, so I actually used a kitchen knife and a chopping board at first! No more pictures since it didn't work out. Anyway, I was able to buy a cutter the next day and was finally able to get on with this project. Don't you just love how DIY is all about trial and error and learn as you go? ;p

Anyway, I just followed my grid in placing my tape to form the pattern. You don't need to worry about cutting the edges perfectly at this point. That's where the cutter comes in later on...

This is how it looked all taped up...

Now the FUN part! Just get the cutter and gently run it along the excess edges like below:

Then, pull the excess tape in the opposite direction. I swear, it magically tears apart! It's like cutting through butter! And since my cutter was new (and super sharp), I just needed to run it over the tape 1-2 times. And I didn't even press that hard so I don't think the blade even touched the table.

Look at that clean sharp edge. Perfection!

Anyway, after I cut out all the excess edges, here's the finished chevron pattern:
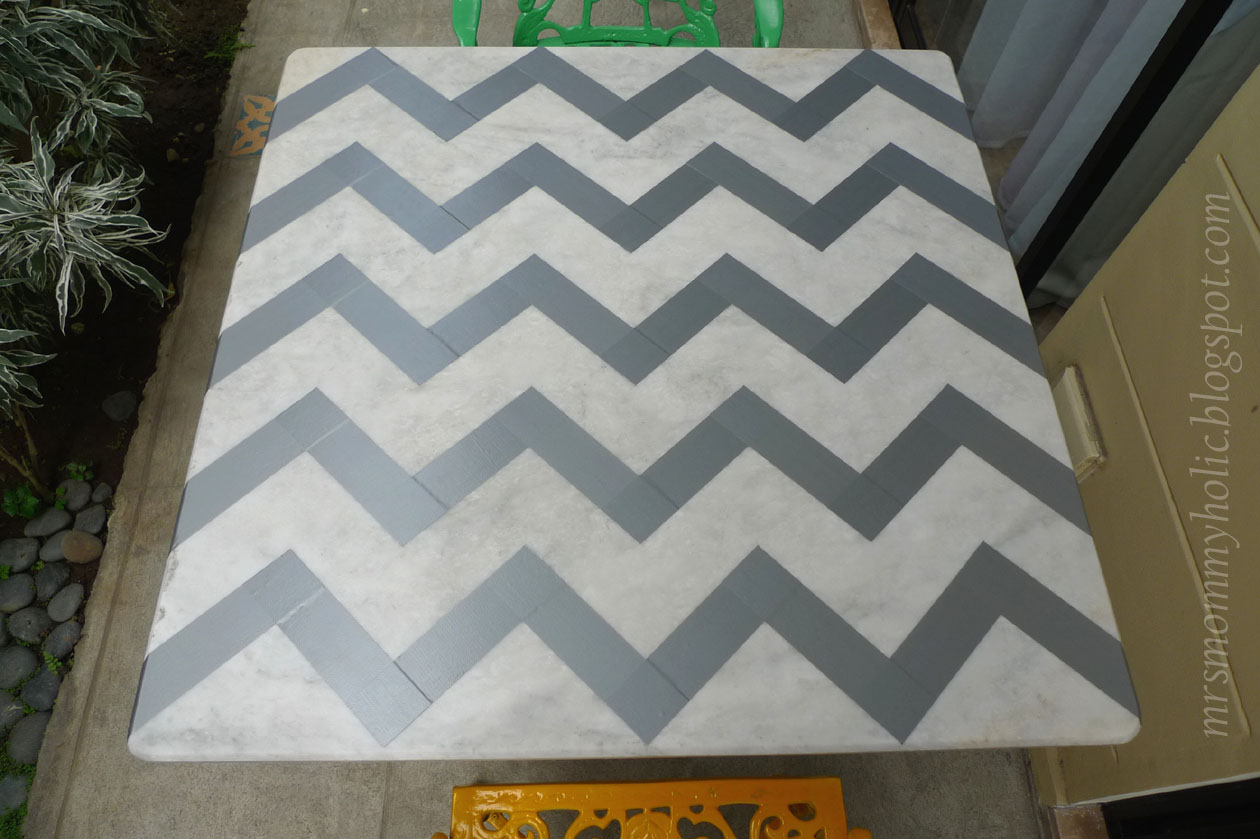


Doesn't the pattern make everything work together? Now the colorful chairs go well with the fun tabletop! And since it's duct tape, I'm sure it'll hold up in the outdoor weather like with rain and stuff. The best part, I got to tell hubby "I told you so!" and he loves the finished product just as much as I do!

Now I love this area of our house! ;p

wow! i love chevron patterns and this one is absolutely adorable! ang clever mo talaga! well done!
ReplyDeleteThanks sis Gracie! ;p
Deletehello, i'm a long time lurker but first time commenter. just want to say you did a fantastic job on your last two projects. Thanks for sharing.
ReplyDeleteThanks Jaki! Glad you liked it. =)
Delete