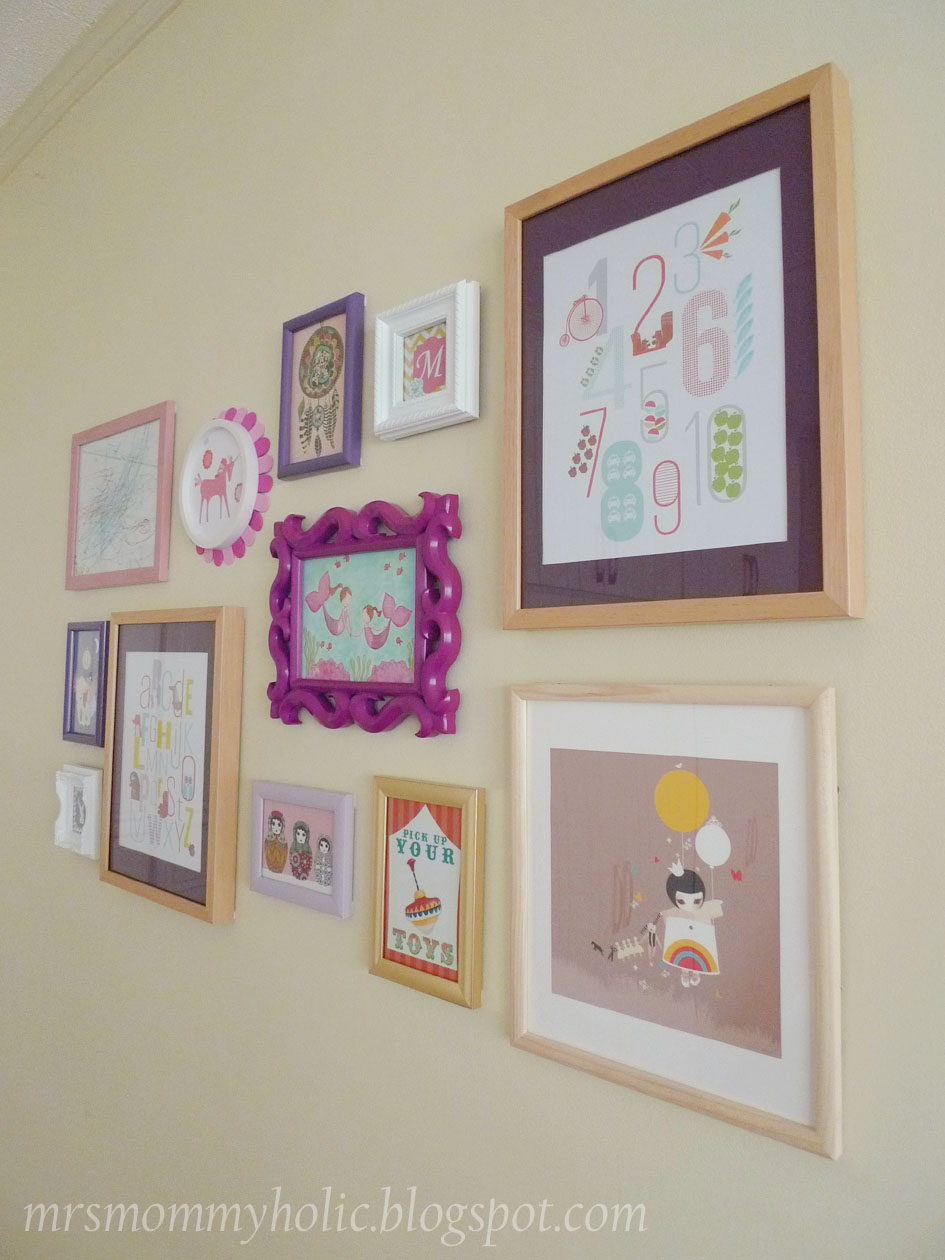
I first put up these photo frames back in 2012 when we only had two kids. I've been meaning to change and add photos ever since we had Skyler and finally I've gotten around to doing it.
Here was one side of the wall before:
Showing posts with label picture frames. Show all posts
Saturday, June 3, 2017
Saturday, March 14, 2015
Removing mounting tape from your walls
Most of the frames in our house are hung on the walls using double-sided mounting tape.
![]() |
| bought this in National Bookstore for P30 |
This is mainly because of these reasons:
1. I'm scared and don't know how to use the electric drill
2. Hubby hates drilling
holes in our walls so useless to ask him for help (well, he did drill some bathroom stuff for me once after I begged him to!)
3. I have a lot of frames and wanted the option of removing or rearranging them later on without having to deal with holes in the wall
Well, all those frames I've put up the past couple of years have remained untouched, until recently when I updated our family silhouette art. I was nervous since I didn't have a good experience in taking off those adhesive hooks before, which also used the same type of tape. The tape in one hook ripped the paint off my wall when I removed it. :(
Anyway, after all this, I now know that mounting tape
is super strong stuff! When they say heavy duty, they mean it! And the thing is, I used quite a lot
because I was afraid of the frames falling and breaking later on (none ever did). Now I'm
learning the hard way. It was a pain to remove! The frames really wouldn't
budge no matter how hard I tugged on them.
What I finally did was to get a
knife and tried to slice carefully through the tape. It was challenging since I didn't want to destroy the walls by peeling off whole chunks of paint which would have been much worse than drilling a hole in the first place. Plus I really needed to put some force for the knife to cut through the adhesive. It did work but there was a lot of stuff left on the walls.
I asked hubby for help and what he did was put baby oil on the remaining adhesive to soften it up. Then he used an old toothbrush to scrape off what was left and finally a washcloth to scrub and clean everything up. And it worked! It took a bit of effort but the walls were damage free, aside from a bit of discoloration from where the frames used to be.
![]() |
| yey good as new! :) |
So the question is, did I use mounting tape again considering how hard it was to remove?
YES, I DID. ;p
But this time, I used less and only on the sides, not anymore in the middle (since that was the hardest part to remove with the knife). The main thing for me was that mounting tape does its job of hanging the frames and even though can be a pain to remove, at least no holes in my walls!
Thursday, March 12, 2015
Updated Family Silhouette Art
I made a DIY silhouette art of our family back in 2012 when it was just me, hubby, Miley and Sabe.
I've been meaning to update it last year ever since Skyler was born, but never got around to doing it until a few days ago. I was thinking whether to just keep our old silhouettes and just add another one for Sky, but decided to just redo everyone's artwork. And it was nice to see the difference after a couple of years. :)
I bought my frames in SM also a few years ago and if I remember correctly, they only had those 4 colorful ones (aside from white and black). Good thing I had the white one and also some yellow spray paint lying around. In just a few minutes, I had my new frame ready! :)
Now here's our updated silhouette art on the wall (and the new arrangement of the frames). So happy Skyler's now part of it! :)
![]() |
| read more about this DIY project HERE |
I've been meaning to update it last year ever since Skyler was born, but never got around to doing it until a few days ago. I was thinking whether to just keep our old silhouettes and just add another one for Sky, but decided to just redo everyone's artwork. And it was nice to see the difference after a couple of years. :)
![]() |
| LEFT: Miley in 2012, RIGHT: Miley in 2015 |
![]() |
| LEFT: Sabre in 2012, RIGHT: Sabre in 2015 |
![]() |
| Skyler's silhouette at 1 year old |
I bought my frames in SM also a few years ago and if I remember correctly, they only had those 4 colorful ones (aside from white and black). Good thing I had the white one and also some yellow spray paint lying around. In just a few minutes, I had my new frame ready! :)
Now here's our updated silhouette art on the wall (and the new arrangement of the frames). So happy Skyler's now part of it! :)
Labels:
art,
decorating,
decorations,
decors,
design,
DIY,
DIY home,
family,
painting,
picture frames,
wall art
Tuesday, December 23, 2014
IKEA shopping loot
Here's the stuff I bought from IKEA Hong Kong:
I'm currently stoking up on duvets and this one had a cute print and was one of the cheapest ones out of all the designs.
I love colorful prints and this pillow was just too cute to pass up. And there are even pineapples in the design!
I love this holder which fits all my cute paper napkins perfectly.
This placemat has a cute design and made of plastic which makes it easier to wipe and clean after eating. :)
So many cute stuff, so little time! I'm really happy with everything I got but if only I could fit so much more in our luggage! I wanted to buy tables, chairs, rugs... Definitely can't wait to travel again to another country with an IKEA store. :p
I'm currently stoking up on duvets and this one had a cute print and was one of the cheapest ones out of all the designs.
![]() |
| ÖDESTRÄD Quilt cover and 4 pillowcases, Queen size – HK $129.9 |
This was one of the duvets I've been wanting for the longest time! I just love the alphabet design! :)
![]() |
| EIVOR ORD Quilt cover and 4 pillowcases, Queen size - HK $169.9 |
I love colorful prints and this pillow was just too cute to pass up. And there are even pineapples in the design!
![]() |
| KNAPPSÄV Cushion, multicolour - HK $69.9 |
I love this holder which fits all my cute paper napkins perfectly.
![]() |
| LIKSIDIG Napkin holder, white - HK $25.9 |
This placemat has a cute design and made of plastic which makes it easier to wipe and clean after eating. :)
![]() |
| KLISTRIG Place mat, multicolour (4 pcs) - HK $25.9 |
This picture frame is made of plastic but the ornate design is
really nice. And it can be used hanging or standing up.
![]() |
| KVILL 5x7 frame, white - HK $59.9 |
These colorful plastic bowls and glasses are perfect for the kids' snacks.
![]() |
KALAS Bowl, assorted colours (6 pcs) - HK $19.9
KALAS Mug, assorted colours (6 pcs) - HK $19.9
|
Miley actually held on to this stuffed toy as soon as we entered and she even wrote her name on the white tag with a pencil! So we had to buy it talaga hehe. And we also bought this cloth crown which if I remember correctly was on sale that time, so I think it was just $19.
![]() |
HASSELMUS Soft toy, mouse - HK $11.9
VITSIG Children's hat - HK $39.9
|
My son is currently addicted to straws so he was already so happy with this purchase hehe. It's a bit wider than a normal straw and the colors are so cute. :)
![]() |
| SOMMARFINT Drinking straw, assorted colours (100 pcs) - HK $7.9 |
So many cute stuff, so little time! I'm really happy with everything I got but if only I could fit so much more in our luggage! I wanted to buy tables, chairs, rugs... Definitely can't wait to travel again to another country with an IKEA store. :p
Labels:
bed,
budget finds,
decors,
home,
Hong Kong,
house,
Ikea,
picture frames,
pillows,
Shopping,
toys
Wednesday, February 20, 2013
Home Decor and MORE from Zalora
While Zalora may be
known more for being an online fashion store where you can get clothes, shoes
and accessories, you may be surprised to know that they also carry a wide array
of Home & Living products. So when I saw an email from Zalora asking
me if I'd like to write about some of the stuff I like from their site, I
didn't even need to think twice about it! I actually already have a mental
checklist of some of my favorite items from repeatedly browsing their store. ;p
What I love about Zalora's Home &
Living section is that they have a great assortment of brands and
items ranging from storage, cooking & kitchen tools, bath, dining &
entertaining, bed linens, rugs, and window treatments. They also have an
impressive selection of pillows & throws, wall decor, lighting, candles
& scents, and even pet accessories!
Anyway, here's my top picks from their site. I can't even begin to
tell you how much I need these things in my life. Like NOW. ;p
THROW PILLOWS
If you're a regular reader of my blog, you know how much I love throw pillow covers since they're such an easy and inexpensive way to change the way your room looks. Here's some of the gorgeous and trendy pillow covers they have online. I'm in love with all the prints and patterns!
![]() |
Keep Calm throw pillows from ARQ Curtains (P499.75)
Made from 100% polyester. Dimension: 16x16 inches
|
![]() |
EMPIRE HOME 16x16 Throw Pillow Cases (P466.75)
Made of cotton canvas with invisible zipper opening. (does not include a filler)
|
PHOTO FRAMES
You know I can't resist a good picture frame when I see one. I really love these colorful ones which is just like what I used for my silhouette art.
![]() |
|
ORGANIZING
I'm currently obsessed with fixing my closet and putting everything in its rightful place. These organizers are just perfect for that.
![]() |
|
![]() |
CHICTEES hanging pocket organizer (P499)
Features a 12-pocket jewelry
organizer with hanger. Contrast piping. Foldable.
|
KIDS & STORAGE
I love how cute these would look in the kids' room!
![]() |
3
SPROUTS Storage Bin (P1950)
A bin sporting kid-friendly
animal motif. It’s made of 100% cotton canvas, with polyethylene coating on the
inside, and measures 17.5" in height and 17" in diameter.
|
ACCESSORIES
I love vintage looking pieces as well as anything floral so these items would look great in my bedroom or living room.
![]() |
REGALONG PAMBAHAY Metal Planters (from P200-P350)
Made of square-tapered
galvanized steel. It features a full decor of decoupage paper and acrylic
paint.
|
CLOCKS
I love bold pops of color around the house so these clocks would be the perfect way to add some life to any wall.
![]() |
| NEXTIME Wall Clocks |
GIFT ITEMS
![]() |
|
![]() |
|
![]() |
AUDREY-FLIP NOTE by Wellspring (P450)
A flip open notepad that comes with a pen. Made of metal. These are great for notes on-the-go as they fit snugly inside pockets, purses or briefcases. Each pad measures 4 3/8" height x 2 3/4" width.
|
Anyway, what's also great about Zalora is the Cash on Delivery (COD) payment option they have for major cities in the Philippines. I for one prefer this, since you don't have to worry about giving your credit card details or even lose sleep over whether your items will get delivered or not after you've paid. Plus, they also offer FREE shipping for orders P1,000 and up (if you order less than P1,000 you’ll be charged a flat shipping fee of P100 for delivery to Luzon and P150 for delivery to Mindanao and the Visayas). And don't forget about the P250 introductory gift voucher when you sign up for the first time. So whether your looking for that perfect accessory to complete your outfit or your home, there are really so many reasons to start shopping at Zalora. ;p
Tuesday, December 18, 2012
Reveal: New wall gallery for my little girl
This gallery has been a work in progress for a few months now and finally it's done! If you remember last month, I posted a sneak peak of the arrangement of the frames I was planning to do (I went with Option B!). But even before that, I was already figuring out what to put in the frames.
Btw, all artwork are from Etsy.com (some I had even bought almost 2 years ago) except this one which is Miley's 1st ever drawing! It definitely deserves a spot on the wall. =)
And here's the DIY flower frame I did (see the tutorial HERE).
Here are the other pictures which are a mix of the different things Miley loves. =)
Oh, and the best part? This whole wall gallery is DRILL FREE! I just used double-sided mounting tape to hang everything. Good job to me haha! =)
And here's the DIY flower frame I did (see the tutorial HERE).
Here are the other pictures which are a mix of the different things Miley loves. =)
Oh, and the best part? This whole wall gallery is DRILL FREE! I just used double-sided mounting tape to hang everything. Good job to me haha! =)
Labels:
decorating,
decorations,
decors,
design,
DIY,
DIY home,
gallery,
home,
house,
kids,
kids bedroom,
picture frames,
room,
wall art
Sunday, December 16, 2012
DIY: How to make a Flower Picture Frame
Here's my latest DIY project, and probably the easiest one yet! I'm working on Miley's wall gallery and decided to spruce up one of the frames. Read on to find out how. =)
I bought this set of 3 round mirror frames from SM at P249.75. They come in different colors btw. I used the smallest size (5") for this project.
You can actually use it as a mirror or a frame. But if you display a photo, there's no glass that covers it which is just fine.
I found these foam popsicle sticks at National Bookstore for P39.50. They're about 6.5" long and really soft.
I just cut the edges of the foam sticks for my petals...
Then I just used masking tape to stick them to the back of the frame. I alternated the light and dark pink colors for this one. And make sure you have already placed your picture inside since you won't be able to open the back part once you've placed the petals.
And here's my new flower frame! Cute right? And I just used double sided mounting tape once again to hang it on the wall (since the hanging hardware will be covered with the petals and masking tape as well anyways).
I spent less than 30 minutes doing this. Super easy! Now, I can't wait to show you the whole wall gallery once it's done. =)
I bought this set of 3 round mirror frames from SM at P249.75. They come in different colors btw. I used the smallest size (5") for this project.
You can actually use it as a mirror or a frame. But if you display a photo, there's no glass that covers it which is just fine.
I found these foam popsicle sticks at National Bookstore for P39.50. They're about 6.5" long and really soft.
Then I just used masking tape to stick them to the back of the frame. I alternated the light and dark pink colors for this one. And make sure you have already placed your picture inside since you won't be able to open the back part once you've placed the petals.
And here's my new flower frame! Cute right? And I just used double sided mounting tape once again to hang it on the wall (since the hanging hardware will be covered with the petals and masking tape as well anyways).
I spent less than 30 minutes doing this. Super easy! Now, I can't wait to show you the whole wall gallery once it's done. =)
Subscribe to:
Posts (Atom)