Thursday, May 31, 2012

Rain, rain (don't) go away...

I just LOVE rainy days. While my husband finds it such a hassle (causes traffic, he can't run/train outdoors, etc.), I find it completely relaxing. There's no better feeling for me that waking up to the sound of rain pounding on the rooftop and windows. It makes me want to curl up in bed or read a good book while eating a bowl of champorado (in my house before, especially when my grandmother was still alive, champorado with tuyo would always be our merienda once it rained).

source

I love the cloudy weather and the coolness the rain brings (I love it when it rains so hard that you don't even need aircon or an electric fan). Of course, I used to look forward to the rainy season when I was younger since it meant no classes during typhoons. Whenever I find out that classes are suspended, I can't go back to sleep no matter how early it is since I just want to take advantage of the whole day.

I also love taking showers in the rain! I remember all the kids in our street would go out of their houses once it started pouring. I also loved making paper boats and then I'd have them float in the canals in our street once it stopped raining (it was definitely a lot cleaner then). ;p

So I'm definitely glad that the rainy season is finally here (the heavy downpour a while ago was definitely an indication). I for one can't stand the freaking heat anymore! Of course, I just hope that everyone stays safe and that we don't get hit by any monster storms or floods (*keeping my fingers crossed*).

Miley in This Kid Is It!

Yey, Miley was featured in one of my favorite mommy blogs Mommy Fleur. I just had to send this picture of her in since I think she looks very much like a fashion blogger with her look and pose haha. ;p

check out the original post HERE

Photo of the Day: Corny Baby

 She couldn't really bite into the corn but she sure did try! =)

Tuesday, May 29, 2012

Happy birthday Vins!

This past weekend has been a busy one for us since it was Vins' birthday! The big 3-0! We had a small bbq party at our house for our friends to celebrate. =)

the best spaghetti ever made by my MIL
the most amazing chicken rice from Big Mama's Place
yummy Banapple cake

The we had a family dinner at Little Rio in BF. Really yummy (and affordable) Japanese food!

missing the sleeping Sabe, who we left at home

So again, happy 13th, este, 30th birthday to the best hubby & dad me and the kids could ever ask for! And if you're worried that you're getting old, promise you don't look it at all! ;p


Sunday, May 27, 2012

Laiya Coco Grove

We took a quick overnight trip last week to Laiya, Batangas. It was such a last minute decision that I barely had enough time to look for a decent place to stay since the rest of the resorts were either fully booked or weren't answering my inquiries. We finally decided to go with Laiya Coco Grove after a hassle free reservation, even though I had my doubts from the reviews I read online.


The resort was huge and sprawling, although it definitely had more cons than pros. We originally wanted to stay in the treehouse accommodation pictured below, but decided against it since the two kids might fall from the stairs.


We were then given a poolside room, but the cottage was actually quite far from the pool. The room itself was just okay. We all fit comfortably inside but you could tell it was kind of old already (I didn't even bother to take pictures, just check their website if you're interested). The cottage had 2 bathrooms but one of the sinks weren't working. The room had a TV, but only 1 working channel! It would have been great if the channel was ABS-CBN or even GMA, but it was some kind of Asian channel that was in Chinese half the time! They said they had cable but apparently they needed to buy load to get it working?!

The pool looked great in the website but the water looked dirty to me. The attendant said they had just put chlorine that's why the water wasn't that clear. Well, it was a shame since we really looked for a resort that had a pool for the kids so I would have wanted it to be much nicer.


They had a beach right in front of the resort but the sand was brown and the water was muddy. Apparently, they have a shuttle that would take you to their white beach a couple of minutes away.

The brown beach.
The shuttle. 1st time of Miley and Sabe to ride a jeep!
The white beach which we practically had all to ourselves! =)


The pros? The buffet meals included in the package were good. They also had wi-fi but in the dining area only.


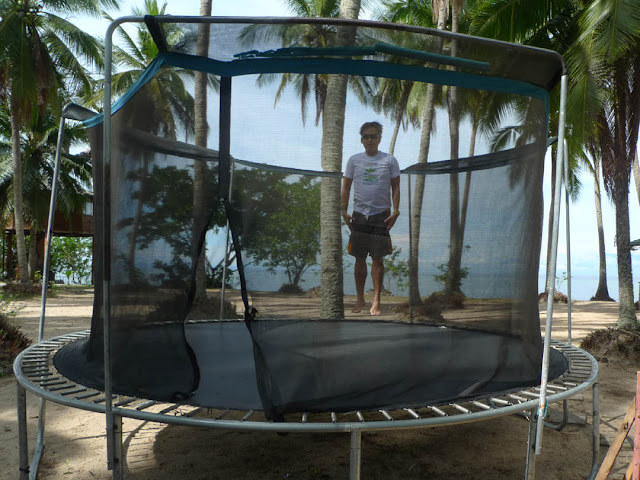
They also had a trampoline for adults and kids that we enjoyed. Vins was actually scared that Miley might hurt herself in the trampoline but she proved us wrong when she bravely went inside and started jumping!


Miley in the trampoline!

The kids also had so much fun playing and swimming in the beach. They didn't want to leave!

picking flowers
sunburnt toes

If ever we take another trip to Batangas, I would definitely choose another resort. But we still had fun and I'm very thankful for the quality time we were able to spend as a family. =)

My new guilty pleasure

Is reading this blog STFU, Parents! STFU means Shut The F*** Up! and it's a blog where individuals (mostly annoyed friends of the parents) submit screen caps of people's TMI status messages or photos on Facebook. Basically, it makes fun of moms and dads who overshare about their kids on social networking sites. 

It tackles different topics from Bathroom Behavior (poop, poop and more poop!) like this one:


...or Story Hour (where parents recount every single thing that happened in their day) like this one:


...or Sanctimommy (posts from self-righteous moms):

...or my favorite, MommyJacking (commenting on someone's status message by relating it to motherhood or baby - when the status is completely a different topic altogether!) like this:


The blog is terribly addicting (some posts are just laugh out loud insane and unbelievable!). What makes it even more funny are the comments under the statuses plus the commentary of the blog founder after every post. She's so sarcastic I love it!

Now as a mom, I myself am guilty of the occasional status message and photo albums dedicated to my kids' milestones in life. I even have the monthly birthdays album (teehee! ;p). Of course once you become a parent, you can't help but want to share to the world (aka Facebook and other social media) what your baby has been up to! You're proud, that's all. But of course, other people might not find your updates about your pregnancy or baby cute or funny. I myself have rolled my eyes or shook my head at some status messages I've seen on my news feed. Let the examples above and others more on the STFU blog be an example of what NOT to post on FB about pregnancies, childbirth experiences and kid’s lives.

So the next time you post a photo or an update about being preggers, or how busy your day was taking care of the kids, or something new your baby did... think twice. You may end up on STFU, Parents! hahaha! ;p


Friday, May 25, 2012

DIY Styrofoam Letters (how to cut & paint styrofoam)

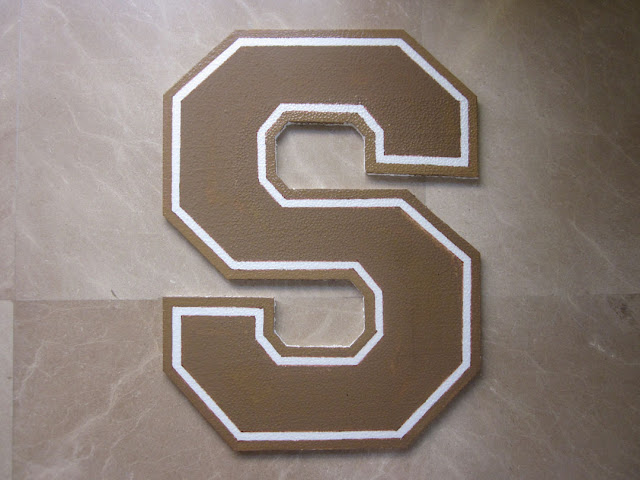
I was on a budget for Sabe's 1st birthday party, so I decided that we could do without the big themed styrofoam backdrop that you can rent for about P8,500. I know this is usually the main attraction in any party since everyone is facing the stage and you have a lot of photos taken there. I didn't want to use a tarpaulin, but instead decided to just make my own jumbo letter cut-outs of Sabre's name made out of styrofoam. It may sound or even seem difficult, but trust me when I say that this was so easy to do, even I was surprised myself!

STEP 1: OUTLINE YOUR LETTERS

The boards I bought at National Bookstore were 2ft x 4ft x 1/2" thick for P49 each. The height of each of my letters were 24" so I was able to fit 2 letters per board. I deliberately chose the thinnest board at 1/2" so that it would be easier to cut. I used the Varsity font which is the same font I used on the invites and other printables and just drew it by hand using a pencil.


You can use different fonts depending on your theme or if you want to do much smaller letters, then just print out your desired size and use it as a template. Just cut out the paper letters with scissors, tape them to the styro and trace the outline of the lettering onto the board.

STEP 2: CUT THE STYROFOAM

I just used a normal knife and I was able to cut through the styro like butter! The edges were straight and I didn't even make such a huge mess with all the stray particles when you break off a piece of foam.


STEP 3: PAINT THE STYROFOAM

I first used a pentel pen to make two half inch borders along the inside of the letter as a guide when painting.


Now, I had no idea how to color styrofoam at first. I didn't know if you could even paint styro in the first place. Well, I had leftover acrylic paint from the owl tree wall mural I did for Miley's room and luckily it was brown!


I used the bigger brush to paint the inside of the letters. The acrylic paint adhered really well and the color looked great! Since the paint I used was water based, I was able to quickly erase any smudges I made beyond the lines by using a wet cotton bud.


The smaller brush was used to paint the half inch border around the edges of the letters and for the sharp corners.


This is what the rest of the letters (and number) looked like during the party. =)


From my supplier ratings, you'll know that I was able to get a grass wall hedge where I stuck the letters on. But even without the grass backdrop, I'm sure it would still look awesome since it has that 3D effect to it. What's great is that since styrofoam is so light, you can just use masking or double sided tape to stick them on the wall. No drilling required! You can make all kinds of sizes or shapes and use different fonts or colors. You can use them to decorate your child's room, make ornaments and other craft projects. And the best part is it's so inexpensive and easy to do!

Thursday, May 24, 2012

DIY Sports Table Centerpiece

Being on a budget really forces me to drain my creative juices to come up with cheap alternatives while party planning. One such instance was coming up with a sports themed table centerpiece. The package I got from my supplier only included 10 balloon centerpieces. I had more than 10 tables but I didn't want to add an additional P300 balloon arrangement per table anymore. I knew I could come up with something... and that I did. If you read my supplier ratings, you'll know that the finished product looked like this, but let me share how I did it. =)


I spent a lot of time online getting ideas and if I could have executed it in the exact way I wanted, I would have used a metal tin bucket as the base and a real foam finger. But since I had to make do with what was readily available, the tin bucket became a hot food bowl I got from the grocery and the foam finger was just printed on cardboard paper. ;p

Here are the materials I used:
hot food bowls - I got these from Shopwise at about P85 for 10 pcs.
- styrofoam - there are lots of different thickness available in National Bookstore, but I already bought these 2ft x 4ft x 1/2" boards (P49 each) which I used for Sabre's name. So I just made do with the leftovers.
- colored cartolina
- cardboard paper
- barbeque sticks
- Japanese paper
- masking tape
- glue
- scissors

These hot food bowls were really a lucky find since it was the exact size I needed. Plus the color was kind of brown so I decided to just stick with the design instead of covering it with Japanese paper.
* If you'll notice though, the label says "Little Princess" and if you look really closely, the design is made up of castles and stars. But who cares? It looks fit for a boys party to me! ;p


For the base, I knew I needed styrofoam to be able to stick the flags in. I traced the base of the bowl on the styro and cut out the circles which would then fit inside.


I used 4 styro circles per bowl to achieve the height that I wanted to be able to stick the flags in - the cardboard hand in the middle and two flags on each side.
* Like I said, I just used leftover styro. You can just buy one with a thicker width so you don't have to pile them up anymore.


 I then searched for foam finger images online, picked one I liked and edited it with Sabe's name. I made 2 versions, one the mirror image of the other, so I could stick them back to back.


I used masking tape to attach the bbq stick on the cardboard cut out of the hand. Make sure the pointy end of the stick is on the bottom so you can easily pierce it through the styro base. Then I just aligned the other side of the hand and glued it together.


I then cut triangles out of green and orange cartolina and pasted the words Happy Birthday and #1 on them. I then did the same thing as I did with the cardboard hand above to attach the bbq stick to the triangle flags.
* Of course, you can also just do the layout of the flags on your computer and just print these out to make it easier (no more extra cutting and pasting needed). I just wanted to add more dimension to the flags... and make my life harder! ;p


I assembled everything in the venue itself. I also had extra balls from the giveaways I bought so I placed these on top so you wouldn't see the styro below. The balls also added extra weight to the centerpiece so that it wouldn't easily topple over. I also stuffed some "grass" in between the balls by cutting up strips of Japanese paper.


So there you have it, my version of a DIY sports table centerpiece! A lot of what I did here was based on just winging it so I definitely had a lot of trial and error. But I had so much fun doing it that especially when you see your vision come to life (naks!). ;p

LinkWithin

Related Posts Plugin for WordPress, Blogger...