Showing posts with label chair. Show all posts

Thursday, April 30, 2015

Japan Surplus Store (BF Paranque)

I've always been curious to check out this Japan Home and Office Furniture store along President's Avenue in BF. Not to be confused with Japan Home Centre or Daiso, this is a surplus shop selling second hand furniture and home accessories.


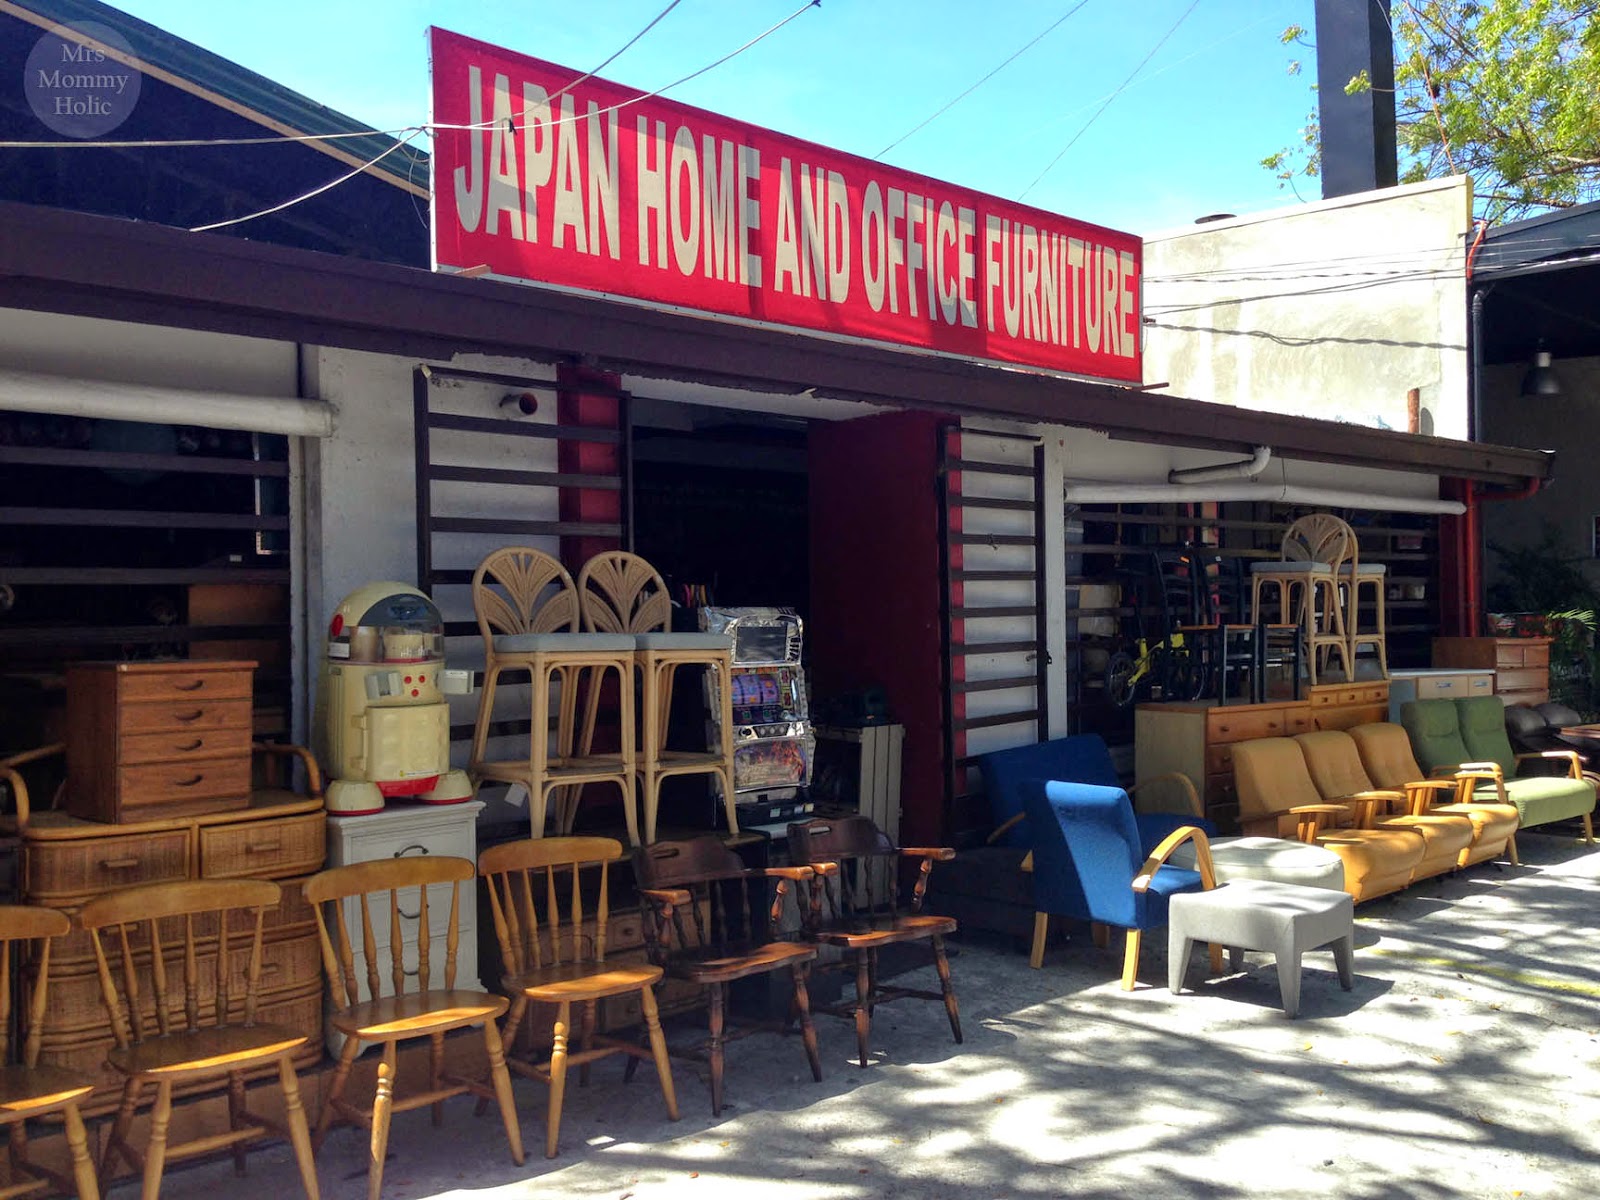
The pieces I've seen displayed outside seemed promising. So I finally found the time to drop by a few weeks ago to check out the prices and to see more stuff.


Upon closer inspection though, I realized that these pieces definitely needed some work. Most were in good condition but you could tell they were definitely used and even old. And what was even more surprising were the prices! Can you believe this black chair pictured below (left) was about P3,500? And you needed to have it reupholstered pa in my opinion since the fabric was dirty and had stains. These tall chairs on the right meanwhile caught my eye since they had that vintage vibe and I could already imagine repainting them in a bright color. However, they didn't seem sturdy enough anymore when I held them. Definitely needed more repairs.


There's more stuff and knick-knacks inside. Be prepared though, it was very dusty and quite hot.


From the first glance, I already knew I wasn't interested in anything. And again, the prices were a bit too expensive for me considering these were surplus stuff. My mom was interested in a bowl that she wanted to put plants in. I swear there was nothing special about it so we were so surprised when we were told it was P650! Ummm, di bale na lang, sa SM na lang kami bibili, bago pa!


These figurines/dolls were probably the only thing I would consider buying...


Again, just to give you an idea of the prices, this cabinet was P9,800 and that center table at the back was P5,800...


Those big cabinets at the back were about P18,000 to P20,000...

they also sell bikes btw

Bottomline, I didn't buy anything from here. If I saw something really unique and special, for sure I would have gotten it. But based on what I saw, I'd rather go to the mall where I can buy brand new stuff for much less. And I wouldn't have to exert effort to paint or fix things anymore. And for the plates and ceramic items, just go to Uniwide or even Landmark for a better and much cheaper selection. But who knows, maybe you can find some hidden gems here if you look hard enough.

Friday, January 10, 2014

DIY: My mom's new chairs

Look what welcomed me when I visited my mom's house! Repainted and reupholstered chairs which she did herself!


These were previously rusty old chairs with paint peeling off and the seats were a cheap looking vinyl leather. Now they look so dainty and cute! I totally love all the colors she used, which were just leftovers from previous paint jobs. But I told her she needs to do something about the seat cushions! I don't like the fabric at all haha! They look cute from afar though. ;p But these were apparently the only ones they had around the house, which were leftover fabric from my cousin's scrub suits years ago. I'm thinking we should go with floral, ikat, or stripes? :)


And that's not all... She even painted those white monoblock chairs! Clap, clap, clap! Good job mom!


Now she's asking me what paint color to use in an accent wall for their living room. And she's going to paint it herself! Naks! I think my mom's gonna give me a run for my money in the DIY department hehe! ;p

Wednesday, November 13, 2013

New pillowcases and paper napkins from Landmark

I haven't been to Landmark for the longest time so I was literally going crazy when I saw all the super nice stuff they had in the home section. I had a limited amount of time to go around so the only things I zeroed on were the pillowcases and paper napkins. Anyway, here's the stuff I ended up getting:

There were so many cute designs for these paper napkins, I wanted to hoard them all!
P39.75 each
I also got one pack with a Christmas design
P29.75

Now here's where I spent so much time - checking out the throw pillows since all the designs were to die for! I literally had a whole cart of pillowcases in different colors and designs, and it took me forever to narrow it down to my final selection. I finally decided on purple tones, since I'm about to put up my Christmas tree which has a purple and gold theme.

LOVE the embroidery on these cases! Size of these are 17"x17"
P229.75, P279 
These were the bigger sizes (about 21")
P109.75, P149.75, P169.75
got varying shades of purple and in different textures

Here's how I arranged them on my couch (you can see the previous arrangement and pillows HERE). Like I keep saying, I love how you can totally transform the look of a room just by changing your pillow covers!


I'm still deciding what pillows to use on the other side. Check out my 2 options. What do you think is better? :p

OPTION A
or OPTION B?

Anyway, there were also so many cute canvas pillow covers with vintage and travel designs like Paris, London, New York... But in the end, I was able to control myself and got just this one:

P179.75

Which I used for our couch inside our bedroom.


I totally want to go back to Landmark when I have more time! I think I can spend one whole day there just at the home section haha! ;p

Monday, September 16, 2013

Real Living Space Tea Party & Walkthrough

I have been an avid reader and fan of Real Living magazine for so many years now, so I was beyond happy when I received an invite to their Real Living Space tea party. During the event, Associate Publisher Tom Castaneda and Editor In Chief Rachelle Medina personally discussed and showed us the spaces that some of Manila's best interior designers have created at the Trion Towers in BCG.


This was the lovely office / craft room set-up that greeted us, with furniture from Heima. The free DIY workshops during the weekend were also held here. Out of all the spaces, this was probably my favorite since I just love all the colors, prints and patterns. Everything just looks so happy and girly! Gosh, I wish I could have a room like this at home where I can do all my DIY projects. Heaven!!!


This is the living area styled by Van Acuna. Hubby was with me and he instantly gravitated towards the aquarium on display (he's been wanting to get an aquarium for the house ever since before). Well, we found out that the aquarium was from ADA Nature Aquariums and it costs a whopping P140,000! That's because all the plants used are real (and imported), the glass of the aquarium is some kind of special crystal (it was so clear!), and the best part is that someone comes to your house once a week to clean the whole thing! So sulit naman pala hehe! ;p


This is the dining space designed by Wilan Dayrit, which is where cocktails was also held.


We then headed upstairs to check 2 of the condo units that were styled for the event. In the first unit, the living / dining area was by Wilmer Lopez featuring furniture from Space Encounters. I really loved the whole vintage, retro, funky style of this area.


The bedroom inside the unit was styled by Pam Tan. My favorite part in the room was probably the butterfly decals on the wall from Dimensione. According to EIC Rachelle, the designer placed them there to cover paint chips on the wall (great idea!).


In the next unit, the living area was styled by Kristine Neri-Magturo. I really like the mix of feminine and masculine elements in the space. If you noticed, there are a lot of antlers used as decors in the room, just like in the other unit, which was purely coincidence from the designers. ;p


The bedroom in the unit was styled by Elle Uy. This room is also one of my top picks since it has that whole bohemian vibe (very Urban Outfitters!). I especially love the curtains and the wall gallery.


It was such a great afternoon and the whole time, I felt like I really stepped inside the pages of Real Living. I love how all the spaces have their own distinct style - there really was something for everyone. Now, I'm even more inspired to start redecorating! Although I need to wait a couple more years before I can start placing breakable accent pieces anywhere around the house with my toddlers running around hehe! ;p


Monday, February 4, 2013

DIY: Duct Tape Chevron Table

Now from my previous post, you saw how I spray painted these iron chairs which come with the matching table below. I wasn't really feeling the marble tabletop since it just doesn't work with my new colorful chairs. Ok, to be honest I HATE IT! It just looks so outdated and I've been thinking of ways on how to make it look better. I was kinda hesitant to paint over it since I wan't sure if the paint would adhere (plus the guy at the hardware store confirmed that they did not have spray paint for marble).

Note: I did research and you can paint over marble, it just requires a whole lot of prep work which I don't think I'd be willing to do. ;p


Anyway, I was all set to live with this sorry looking table until I saw some grayish silver tape while I was browsing at Daiso Japan store (that was the day I bought my new plates and mugs hehe!). It wasn't until I got home that I got the idea to use that tape to make a chevron pattern on the tabletop! I went to True Value the next day where I was able to buy some duct tape. Actually, I didn't know they came in different colors (there was purple, green, red, blue, etc). The Scotch brand is quite expensive too at P500 a roll! Good thing I was able to find a cheaper brand. I was torn between buying a yellow one but decided to stick with gray (so it wouldn't compete so much with the already colorful chairs).

Hubby was very doubtful with my plan (in fact, he though I was nuts). But once I get an idea, I can already see the end result in my head and I was sure it was going to look great!


Anyway, the table was 32" x 32" and after deciding on the size of the chevron, I marked the table with a sort of grid (every 4" across and every 6.4" for the height) to guide me when I place the tape. The pencil marks are easily erased after btw.


Look at my cutie patootie assistant helping me measure. I think she's more interested in what's on the iPad though. ;p


Now, here's the thing. If this is your first time to work with duct tape (like me) then you have to know that it is the STICKIEST tape ever! You can't use scissors if you want a good, clean cut because the adhesive sticks to the blade and you end up with a crooked mess (trust me). And this would NOT work with the chevron pattern I was going to do which needed sharp pointed edges. I was all set to call off the whole project (and admit defeat to hubby) but then I read a tutorial that you need to use a craft knife and a self-healing cutting mat (which of course I don't have). I couldn't find a cutter around the house for the life of me during that time, so I actually used a kitchen knife and a chopping board at first! No more pictures since it didn't work out. Anyway, I was able to buy a cutter the next day and was finally able to get on with this project. Don't you just love how DIY is all about trial and error and learn as you go? ;p


Anyway, I just followed my grid in placing my tape to form the pattern. You don't need to worry about cutting the edges perfectly at this point. That's where the cutter comes in later on...


 This is how it  looked all taped up...


Now the FUN part! Just get the cutter and gently run it along the excess edges like below:


Then, pull the excess tape in the opposite direction. I swear, it magically tears apart! It's like cutting through butter! And since my cutter was new (and super sharp), I just needed to run it over the tape 1-2 times. And I didn't even press that hard so I don't think the blade even touched the table.


Look at that clean sharp edge. Perfection!


Anyway, after I cut out all the excess edges, here's the finished chevron pattern:


Doesn't the pattern make everything work together? Now the colorful chairs go well with the fun tabletop! And since it's duct tape, I'm sure it'll hold up in the outdoor weather like with rain and stuff. The best part, I got to tell hubby "I told you so!" and he loves the finished product just as much as I do!


Now I love this area of our house! ;p

LinkWithin

Related Posts Plugin for WordPress, Blogger...