

Showing posts with label wall stickers. Show all posts
Showing posts with label wall stickers. Show all posts
Wednesday, April 5, 2017

Tuesday, August 4, 2015
DIY Triangle Accent Wall
After I painted my kids' room blue, I knew I wanted to do something with the main wall behind their bed. It previously had an owl mural so the plain blue was just looking well a little... plain. ;p


Saturday, November 10, 2012
Decorative Letters from Invitation House
I'm so happy I found these letters from Invitation House since I've been wanting to place Miley's name on her bedroom wall for the longest time already. The letters are made from lightweight cardboard material and cost P120 each. I think it's already a steal compared to some other letters (although made of wood) being sold online at more than twice the price.

Each letter is 7" tall and 3cm thick. They have different designs per letter so you can mix and match, but I choose this design which I think matches the room the best. And I liked it the most. =) If you don't like any of the designs though, you can just change it by cutting out and gluing scrapbook / giftwrapping paper on top of the letter. I actually plan to do this when I buy letters for Sabe's room since they don't have a design that fits the color combo I want.

Since the letters are super light, they just needed a few strips of my favorite mounting tape (P39.75 at Handyman) to stick to the wall. This tape is super strong which is perfect since I just know the kids will try to remove the letters haha! And I got to test it when I tried moving a letter a few centimeters (since it was a bit crooked) and it wouldn't budge!

And here's the finished product! Miley loves it, she now keeps spelling her name out loud. =) And as expected, Sabe keeps wanting to pull the letters down though (with matching mischievous smile). Don't worry Sabe, you'll have your own set soon! =)


If you don't feel like hanging the letters, you can just use them to decorate a bookshelf or a console table. Or even use them as part of a centerpiece for a party. So cute right? =)

 |
| their store in Alabang Town Center |
Each letter is 7" tall and 3cm thick. They have different designs per letter so you can mix and match, but I choose this design which I think matches the room the best. And I liked it the most. =) If you don't like any of the designs though, you can just change it by cutting out and gluing scrapbook / giftwrapping paper on top of the letter. I actually plan to do this when I buy letters for Sabe's room since they don't have a design that fits the color combo I want.


And here's the finished product! Miley loves it, she now keeps spelling her name out loud. =) And as expected, Sabe keeps wanting to pull the letters down though (with matching mischievous smile). Don't worry Sabe, you'll have your own set soon! =)


If you don't feel like hanging the letters, you can just use them to decorate a bookshelf or a console table. Or even use them as part of a centerpiece for a party. So cute right? =)
Thursday, July 19, 2012
Wall stickers for kids
I really love wall decals since they're such a fun and easy way to update any room. I have a couple put up in my home (see here and here). Before, they were really expensive and I could just find them online. But now, you can find a lot of designs in different stores for a steal! Here's 3 places you can get cheap and nice wall stickers for kids.
I found these wall stickers at Robinsons Department Store. I grabbed all the kiddie designs since they were on sale at 50% off so each sheet was just P100.


Here's a closer look at the stickers. I'm planning to use the airplanes and spaceships for Sabe's room which I hope to finish in the next couple of months. The owl stickers are obviously for Miley, to go with her owl themed room.

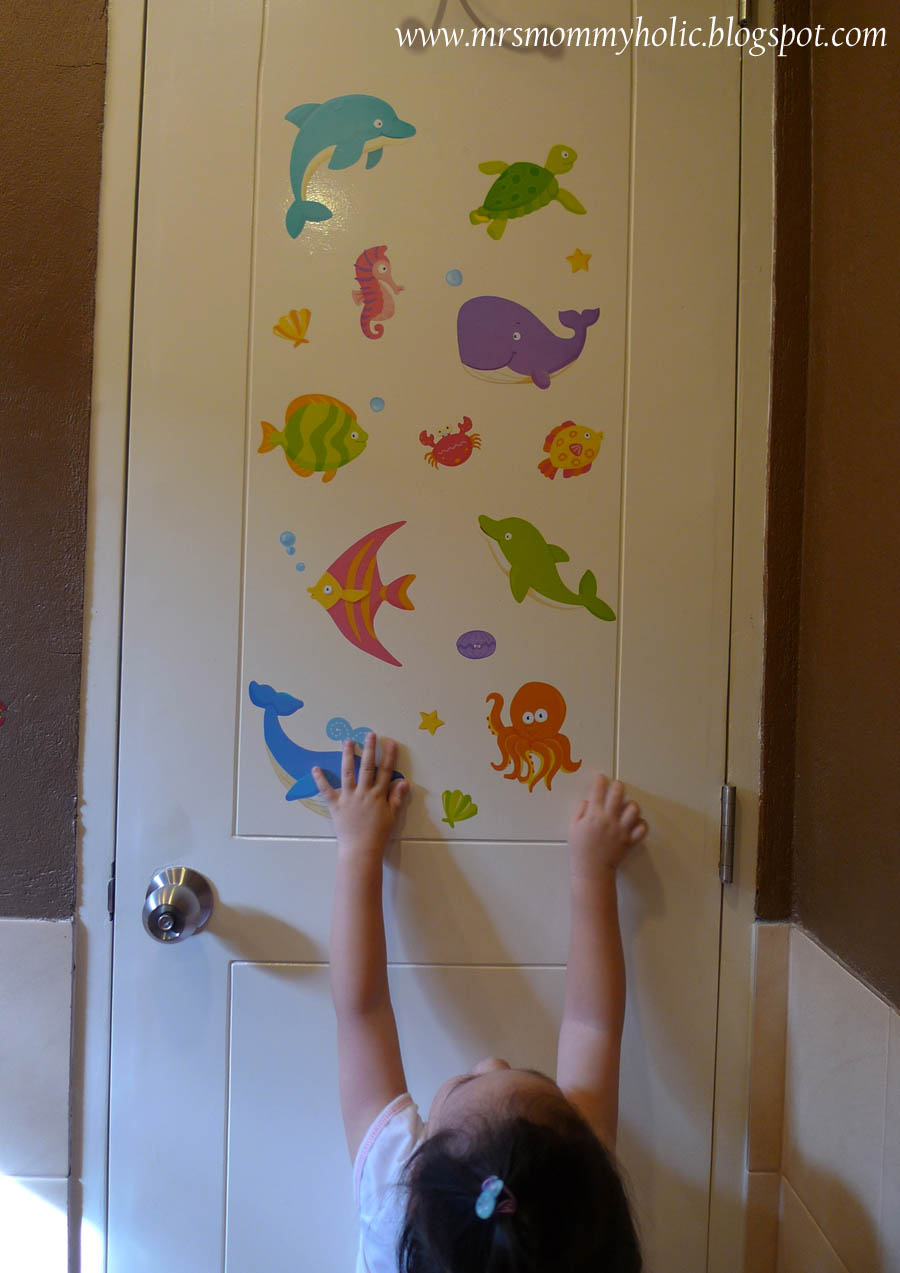
You can also find wall stickers at Japan Home Centre / Daiso Store. I was surprised that they have a lot of designs and really great quality too! The best part, everything for P66 or P88! I got the sea creatures set (this was P66) since Miley loves fishies and the ocean.

I decided to put them on her bathroom door. Miley isn't potty trained yet and she hates spending time in there (unless she's going "swimming" which means tub time). At least she'll have something to look at when she's in the potty haha!

Anyway, the kids really love it! I intentionally placed them higher up the door so Miley wouldn't be able to peel them off (she loves doing that). Problem is, she now asks us to carry her so she could touch and point to the fish. =)


These stickers are from 168 Mall in Divisoria and they cost just P25 each! Although they're much smaller stickers, they have a 3D effect (they aren't completely flat) which makes them fun for kids. They have so many designs to choose from but as usual, I got the owl and fish ones.

I also placed these in Miley's bathroom to make it a really fun place for her. Don't they look super cute? =)


It still surprises me how cheap these stickers are nowadays. Before, I spent about P500 - P1000 for each sheet! Now you can get the same designs for a fraction of the cost. With wall stickers, you don't have to spend a fortune to add life to your child's room. Since they're so affordable, no need to worry about changing them when your kids rip them or grow tired of the designs. Just buy a new set and stick them back up!
I found these wall stickers at Robinsons Department Store. I grabbed all the kiddie designs since they were on sale at 50% off so each sheet was just P100.


Here's a closer look at the stickers. I'm planning to use the airplanes and spaceships for Sabe's room which I hope to finish in the next couple of months. The owl stickers are obviously for Miley, to go with her owl themed room.

You can also find wall stickers at Japan Home Centre / Daiso Store. I was surprised that they have a lot of designs and really great quality too! The best part, everything for P66 or P88! I got the sea creatures set (this was P66) since Miley loves fishies and the ocean.

I decided to put them on her bathroom door. Miley isn't potty trained yet and she hates spending time in there (unless she's going "swimming" which means tub time). At least she'll have something to look at when she's in the potty haha!

Anyway, the kids really love it! I intentionally placed them higher up the door so Miley wouldn't be able to peel them off (she loves doing that). Problem is, she now asks us to carry her so she could touch and point to the fish. =)

These stickers are from 168 Mall in Divisoria and they cost just P25 each! Although they're much smaller stickers, they have a 3D effect (they aren't completely flat) which makes them fun for kids. They have so many designs to choose from but as usual, I got the owl and fish ones.

I also placed these in Miley's bathroom to make it a really fun place for her. Don't they look super cute? =)


It still surprises me how cheap these stickers are nowadays. Before, I spent about P500 - P1000 for each sheet! Now you can get the same designs for a fraction of the cost. With wall stickers, you don't have to spend a fortune to add life to your child's room. Since they're so affordable, no need to worry about changing them when your kids rip them or grow tired of the designs. Just buy a new set and stick them back up!
Thursday, March 22, 2012
Our new bedroom wall
I once got obsessed with wall stickers and hoarded them like there was no tomorrow. I bought several from Multiply, in bazaars, and finally in Bangkok where they were selling them for less than half the price I paid online (grrrrr!). What I loved about them is that you can make such a big difference in a room without having to paint or put holes in your walls.
Anyway, I had so many designs to choose from that I couldn't decide which ones to use (labo noh?). Well, when we moved into our home, I finally got the chance to use this pole wire decal to spice up our boring bedroom wall.

It took me the whole morning to stick them (keeping those thin lines straight were a bit tricky) but the end result was worth it!

Now off to find more places to stick the other wall decals I have! ;p
Anyway, I had so many designs to choose from that I couldn't decide which ones to use (labo noh?). Well, when we moved into our home, I finally got the chance to use this pole wire decal to spice up our boring bedroom wall.

It took me the whole morning to stick them (keeping those thin lines straight were a bit tricky) but the end result was worth it!

Now off to find more places to stick the other wall decals I have! ;p
Tuesday, February 28, 2012
DIY: Owl Tree Wall Mural
Miley just loves owls ever since she was a baby (I think it started when she watched a Twinkle Twinkle Little Star video featuring an owl). So when we moved into our new house, there was no question what design her room would be. I knew I wanted to put a tree mural on this wall so I searched online for decal stickers, but they were all so expensive! The ones I wanted were about $100 up!

No way was I going to spend that much when I could make it myself. So, armed with my self-taught photoshop skills (thank you to all those years working in advertising), I found a peg of a wall sticker and recreated it. Now this takes a lot of time and effort, so if you don't have either, then I recommend just buying the stickers.

After I had finished making the owls and the leaves, I had them printed on sticker paper. Each sticker sheet is 1ft x 1ft and I had 12 sheets printed. The whole thing cost about P1300.

After I cut the stickers, I then positioned them on the wall using scotch tape first. After I was happy with the arrangement, I then drew the tree trunk free hand with a pencil.

I then used painter's tape to outline the shape of the tree.

I used this brown paint from Ace Hardware (around P200). They had me choose what shade of brown I wanted then they punched the codes in the computer and it was mixed by a machine. It was my first time to experience that so it was pretty cool haha! Of course I made sure the paint I got was water based so it would have no smell (it didn't) and it would wash off easily on my hands or on the wall if I made a mistake (it did).

I used a paintbrush at first but the paint came out uneven on the walls because of the bristles! I think I spent about an hour just painting and reapplying several layers of paint to make it even but to no avail. I then used a rollerbrush and the paint came out perfect and consistent. I also just spent about 10-15 minutes using the rollerbrush to paint the entire tree! So quick and easy and no drips!

My favorite part! Removing the tape!

Now, this was the problem. There were some parts where the paint seeped through the tape causing jagged edges. What I did was buy a brown pentel pen and just traced over the jagged lines. Problem solved!

So again, this was Miley's boring blank wall BEFORE...
And this is how it looks AFTER! If you look closely on the bottom left part, you'll see the happy occupant of the room =)


After I showed this to my friends and family, I got so many requests to make murals for their rooms! But like I said, this is really a labor of love. If I wasn't so kuripot, I would have probably just gave it and bought the ready made wall decals to make my life easier. But still, its a different feeling knowing you worked on something yourself. I'll probably do one again for Sabre's room in the future. For now I'm just really happy with how beautiful this turned out! =)


No way was I going to spend that much when I could make it myself. So, armed with my self-taught photoshop skills (thank you to all those years working in advertising), I found a peg of a wall sticker and recreated it. Now this takes a lot of time and effort, so if you don't have either, then I recommend just buying the stickers.

After I had finished making the owls and the leaves, I had them printed on sticker paper. Each sticker sheet is 1ft x 1ft and I had 12 sheets printed. The whole thing cost about P1300.

After I cut the stickers, I then positioned them on the wall using scotch tape first. After I was happy with the arrangement, I then drew the tree trunk free hand with a pencil.

I then used painter's tape to outline the shape of the tree.

I used this brown paint from Ace Hardware (around P200). They had me choose what shade of brown I wanted then they punched the codes in the computer and it was mixed by a machine. It was my first time to experience that so it was pretty cool haha! Of course I made sure the paint I got was water based so it would have no smell (it didn't) and it would wash off easily on my hands or on the wall if I made a mistake (it did).

I used a paintbrush at first but the paint came out uneven on the walls because of the bristles! I think I spent about an hour just painting and reapplying several layers of paint to make it even but to no avail. I then used a rollerbrush and the paint came out perfect and consistent. I also just spent about 10-15 minutes using the rollerbrush to paint the entire tree! So quick and easy and no drips!

My favorite part! Removing the tape!

Now, this was the problem. There were some parts where the paint seeped through the tape causing jagged edges. What I did was buy a brown pentel pen and just traced over the jagged lines. Problem solved!

So again, this was Miley's boring blank wall BEFORE...
And this is how it looks AFTER! If you look closely on the bottom left part, you'll see the happy occupant of the room =)


After I showed this to my friends and family, I got so many requests to make murals for their rooms! But like I said, this is really a labor of love. If I wasn't so kuripot, I would have probably just gave it and bought the ready made wall decals to make my life easier. But still, its a different feeling knowing you worked on something yourself. I'll probably do one again for Sabre's room in the future. For now I'm just really happy with how beautiful this turned out! =)

Subscribe to:
Posts (Atom)
LinkWithin
